These instructions describe the setup of a German language Magento 2 installation with the necessary settings for sales in Germany. Firstly, a variant of the installation of Magento 2 is described in brief. Following this, the necessary steps for the adaption to Germany by means of the language pack and the extension MageSetup are given in detail.
[Read these instructions in German here: Magento 2 komplett auf Deutsch installieren.]
System requirements
Magento 2 generally requires a system with the following specifications:
| Webserver | Nginx version 1.8 or higher, or alternatively Apache 2.2 or 2.4 |
| PHP | PHP 5.6 or PHP 7.0 |
| MySQL | MySQL 5.6 or 5.7, or alternatively MariaDB 10.0 or higher |
Additionally, access to the console (e.g. via SSH) is mandatory. A FTP-based installation is generally possible, but in this case automated customizations for Germany could not be applied with this method. More detailed informations concerning requirements and the required PHP modules are provided by Magento.
Magento 2 installation
Generally there are different ways to install Magento 2. In the following instruction the installation by means of composer is described exemplarily and reduced to the essentials. An overview of the installation methods is provided here by Magento.
Composer installation
To be able to realize the installation with Composer, it has to be installed at first:
$ curl -sS https://getcomposer.org/installer | php
$ mv composer.phar /usr/local/bin/compo
Download of Magento 2
Now the installation can be executed using Composer:
$ composer create-project --repository-url=https://repo.magento.com/ magento/project-community-edition /var/www/magento2/This command downloads the necessary Magento 2 files and writes them to the directory /var/www/magento2.
Installation of Magento 2
The actual installation of Magento 2 can now be performed with the web installer. Therefore the shop URL has to be opened in a browser. Here the installation credentials (including URL and database name) must be entered.
Installation of the language pack
After the installation of Magento 2 has been completed or if the language pack shall be integrated into an existing system, initially the package has to be downloaded using composer:
$ composer require splendidinternet/mage2-locale-de-deAs appropriate the frontend JavaScript translations have to be deleted and the static contents have to be newly generated afterwards:
$ rm -f pub/static/frontend/Magento/luma/de_DE/js-translation.json
$ php bin/magento setup:static-content:deploy de_DE
Now it is possible to switch to German language in admin panel.
Change backend language
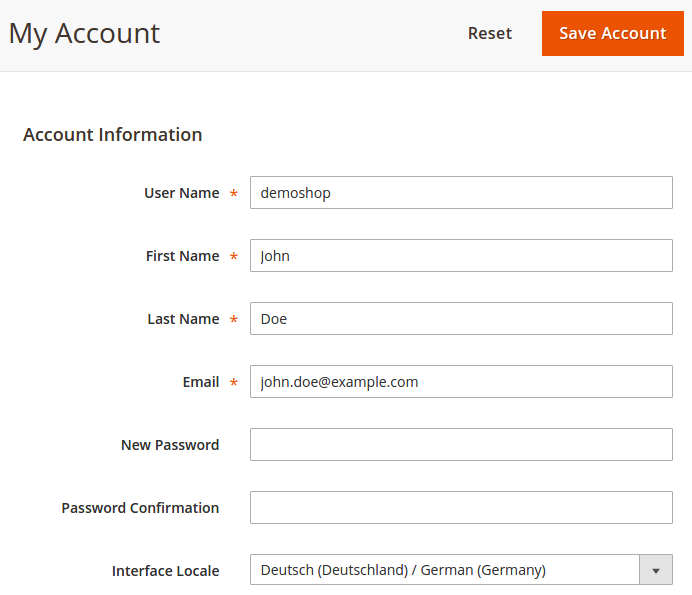
After selecting System > Permissions > All Users the users of the admin panel can be opened for editing separately and switched to German language using the field Interface Locale. After their next login they find themselves in a German Backend.

Change frontend language
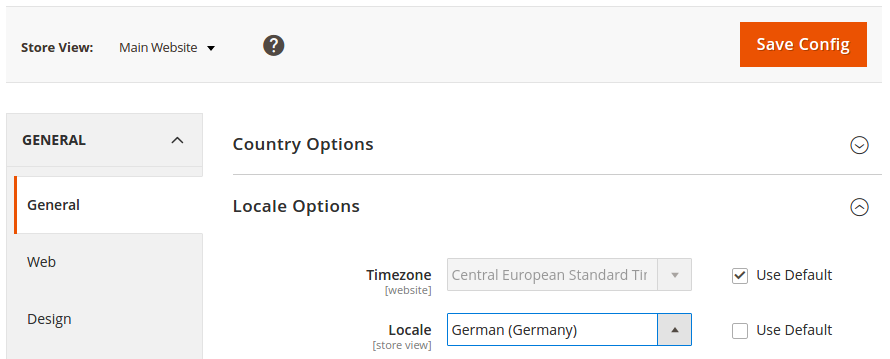
To change the language of the shop fronted generally or for a specific store view to German after navigating to Stores > Settings > Configuration the scope can be defined in the upper left corner. Afterwards in General > General > Locale Options the Use Default checkbox can be deactivated for the field Locale in which the language can be changed to German.

Installation of MageSetup
The extension MageSetup automatically applies a series of adjustments in the shop. So the settings for the particular country do not all have to be made manually. This includes tax rules, tax rates, general business terms, and notifications for shipping costs.
The installation of MageSetup is performed using Composer:
$ composer require firegento/magesetup2:dev-developThen the module must be activated:
$ bin/magento module:enable FireGento_MageSetup
$ bin/magento setup:upgrade
After the installation and activation of the module have been completed the actual changes can be made:
$ bin/magento magesetup:setup:run deWhen everything has completely run in console the adjustments in the shop have already been made. Now further changes concerning legal contents (e.g. general terms of business) can be made in the admin panel as appropriate.
